Template:DeviljhoTopics
| |
MH3: Deviljho Music Theme |
| Deviljho | |
|---|---|

| |
| English Name: | Deviljho |
| Nicknames: | Jho |
| Titles: | The Great Devourer, Violent Wyvern |
| Romaji: | Ibirujo |
| Japanese Name: | イビルジョー |
| Japanese Title: | 恐暴竜 |
| Korean Name: | N/A |
| Species: | Brute Wyvern |
| Element/s: | |
| Ailment/s: |
|
| Weakest to: | |
| Weakness Sign: | Limping |
| Signature Move: | Lunging Bite, Dragon Breath |
| Habitats: | Deserted Island, Flooded Forest, Tundra, Sandy Plains, Volcano (3rd), Misty Peaks |
| Size: | |
| Monsters in Relation: | Duramboros, Rust Duramboros, Barroth, Jade Barroth, Uragaan, Steel Uragaan, Abiorugu and Brachydios |
| First US/EU Appearance: | File:Logo-MH3.png (2010) |
| First JP Appearance: | File:Logo-MH3JP.png (2009) |
| Latest Appearance: | |
| Generation: | 3 |
Deviljho, informally known by many nicknames (e.g. Jho), is classified as a Brute Wyvern. It can only be fought in High Rank quests and is dreaded by the inexperienced and unready hunters. It primarily attacks using its powerful jaw and tail. In rage mode, it can exhale a powerful Dragon Element breath attack, which can inflict Dragonblight. Hunters afflicted by Dragonblight will find their weapon's affinity dramatically reduced and the element (on the weapon) negated. Because of their high body heat and metabolism, Deviljho are always hungry, and are in constant search of a food source.
When Deviljho is enraged, its muscles will swell considerably and turn red, causing previous battle scars to become visible. In its enraged state, Deviljho's defenses also change; it becomes more vulnerable to attacks on the stomach and Elemental damage (Thunder and Dragon), while most other areas of its body become tougher.
In its debut appearance in Monster Hunter Tri, Deviljho can be summoned by Qurupeco in High Rank quests (HR31+). However, because it is a wanderer with no fixed habitat, it can be found roaming any High Rank quest at any time. Other than the Quest Speak of the Deviljho, it is not until HR51+ that players are specifically sent out to hunt a Deviljho.
In Monster Hunter Portable 3rd, Deviljho has a chance to appear after clearing HR5/HR6 quests as a Warning Quest Monster, as well as meeting it randomly while in Upper Rank quests (similar to Tri). If Deviljho appears via the Warning Quest, the player is given another 50 minutes to slay or capture it, and the supply box will be refilled. Even if the Warning Quest is failed, it will count as beating the initial quest. As with Tri it isn't until much later in the game players are sent out to actually hunt a Deviljho.
In-Game Description
Template:MonsterDescriptionBorder
Notes
- Deviljho will usually prey on Aptonoth, Popo, Slagtoth, or Gargwa to recover stamina.
- It sometimes eats from the corpse of a slain wyvern, its own tail or an already captured monster. It also sometimes attacks other Wyverns in the area if it's hungry, dealing damage to them.
- Deviljho can leap at a hunter and pin them down, before attempting to devour them. Each bite will cause a significant amount of damage, until the player is able to struggle away or throw a Dung Bomb. If the Deviljho is exhausted, it will recover stamina and inflict Defense Down on the pinned Hunter due to its corrosive saliva. [1]
- When fought in the Tundra, Deviljho will limp away to Area 1 and break into a hidden area to rest (the same area that is opened by Jade Barroth). The unlocked areas are one of the few places where Dragonbone Relics can be gathered.
- If Deviljho is not weakened and is in Area 1, the blockade can still be broken down if Deviljho attacks it. If Deviljho breaks the blockade on its own, without the hunter baiting it into attacking the rubble, it drops a shiny.
- Deviljho sleeps in the second of the two Secret Areas that appear, also like Jade Barroth.
- If Deviljho does the 'Stomp' Attack in Area 7 of the Tundra, icicles will fall from the ceiling, doing minor damage if they hit players.
- Deviljho's Rock Fling attack will inflict different Blights depending on the area; in the Tundra, it inflicts Iceblight, in the Volcano it inflicts Fireblight, and in the Flooded Forest it inflicts Waterblight.
- Deviljho's Dragon Breath attack is performed at a 180 degree angle sweep from right to left. The safest spots to be in during this attach are near the tail or under him. If the player finds them self in the range of the breath, the best options are to block the hit if they have a shield, or panic dive away. It is possible to evade this attack by rolling but it is very unsafe unless the timing is spot-on.
- Deviljho is back in Monster Hunter Portable 3rd with some new features.
- Deviljho now has a new attack where it quickly swings its tail first to its right, then around itself to its front, while slightly moving forward during the attack. Due to its swift speed compared to the rest of Deviljho's attacks, it can be tricky to avoid if it catches hunters off-guard. The best way to avoid this attack is to quickly get underneath the Deviljho.
- Its Dragon Breath no longer inflicts Dragonblight, as the Dragonblight status ailment has been removed. This only applies to Portable 3rd, as the effect returns in 3U.
- Deviljho can now be fought in the very last village quest. It will appear in the Land Arena (with its own introduction cutscene), and after it has been slain or captured, Tigrex and Nargacuga will be fought simultaneously. Despite being met in a Low Rank Quest, the three monsters are as powerful as their High Rank equivalents, much like the final Village Quest Monster Hunter in Monster Hunter Freedom Unite, where monsters were G-Rank.
- Like Duramboros, it may counter-attack the hunter immediately after it staggers like when its face has been broken.
- Deviljho can no longer be hunted in Monster Hunter 3 because the online servers have been shut down.
Savage Deviljho
- Deviljho makes a return in Monster Hunter 3 Ultimate, but a variant also appears for the first time, the Savage Deviljho (怒り喰らうイビルジョー), which has a slightly differing appearance when in rage mode.
Breakable Parts
| Head (Break and Scarred) |

|
| Tail (Sever) |

|
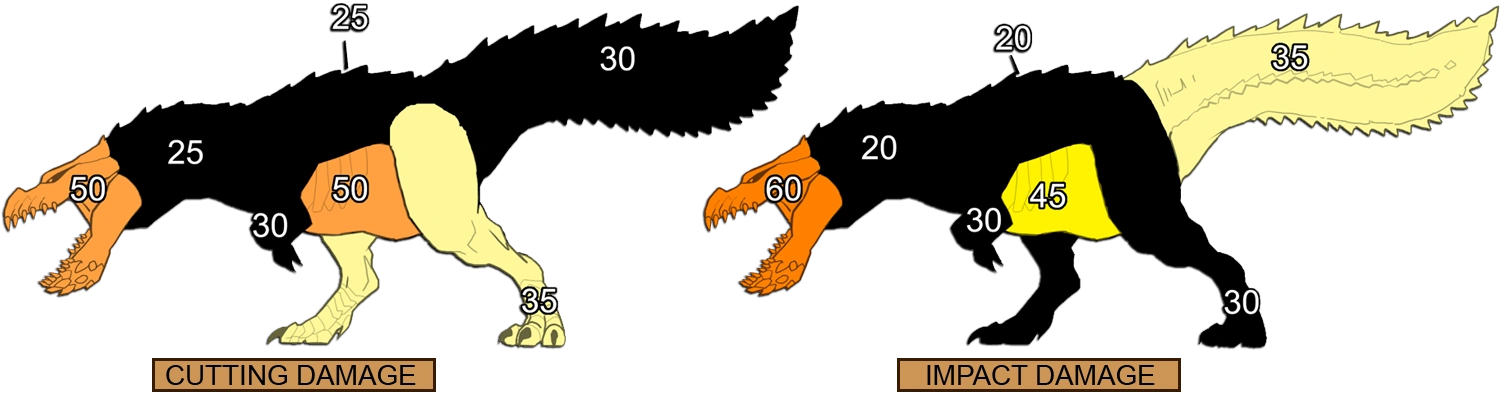
MH3 Analysis
For the damage formula (how it's calculated), hitzone charts, Deviljho info and more click the following links: Monster Hunter 3 Damage Formula or Monster Hunter 3 Hitzone Charts. Images created by Inkoseh.

|
|
Source: http://www1.atwiki.jp/mh3wii/ | ||||||||||||||||||||||||||||||||||||||||||||||||||||||||||||||||||||||||||||||||||||||||||||||||||||||||||||||||||||||||||||||||||||||||||||||||||||||||
| Item Effect | |||||
| Item Name | Able | Effectiveness | Duration (1st time) | Duration (2nd time) | Notes |
| Pitfall Trap | ✔ | ★★★ | 12sec, 23sec (fatigue) | 10sec, 13sec (fatigue) | |
| Shock Trap | ✔ | ★★☆ | 8sec, 15sec (fatigue) | 5sec, 5sec (fatigue) | |
| Flash Bomb | ✔ | ★★☆ | 30 sec | 15sec, 10sec, 5sec (min) | Add 5sec when fatigued, Subtract 5sec when enraged. |
| Sonic Bomb | x | ☆☆☆ | |||
| Dung Bomb | ✔ | ★★☆ | Used to get out of pin attack or, when weakened, to get him out of an area. | ||
| Meat | ✔ | ★★★ | Used when exhausted. Deviljho has even been seen eating while in rage mode. | ||
MHP3rd Analysis
Information are taken from mhp3rd.net.
Monster Hunter 3 Ultimate Analysis
Source: BradyGames Guide
Polls
|
|
Template:Monsters