mNo edit summary |
(Added an item that can can be obtained in this area) Tag: Visual edit |
||
| (25 intermediate revisions by 19 users not shown) | |||
| Line 1: | Line 1: | ||
| ⚫ | |||
| − | {{MusicTheme |
||
| − | |||
| − | |video = <youtube width=70 height=25>CAOVZP4JtW4</youtube> |
||
| − | |||
| ⚫ | |||
| − | |||
| ⚫ | |||
| − | |||
| − | |||
| ⚫ | |||
|Name = Tundra |
|Name = Tundra |
||
| − | |Image = |
+ | |Image = MHP3-Tundra Screenshot 001.png |
|ENG Name = Tundra |
|ENG Name = Tundra |
||
|JPN Name = 凍土 (Tōdo) |
|JPN Name = 凍土 (Tōdo) |
||
| + | |Area Icon = [[File:Tundra Icon.png]] |
||
|Number of Areas = 9 |
|Number of Areas = 9 |
||
|Hazards = Cold regions (All Areas) |
|Hazards = Cold regions (All Areas) |
||
|Resources = Isisium, Gracium, Blood Stone |
|Resources = Isisium, Gracium, Blood Stone |
||
| − | |Small Monsters = [[ |
+ | |Small Monsters = [[Anteka]], [[Baggi]], [[Bnahabra]], [[Bullfango]], [[Felyne]], [[Giggi]], [[Melynx]], [[Popo]] |
| − | |Large Monsters = [[ |
+ | |Large Monsters = [[Barioth]], [[Brachydios]], [[Bulldrome]], [[Deviljho]], [[Savage Deviljho]], [[Gammoth]], [[Gigginox]], [[Baleful Gigginox]], [[Glacial Agnaktor]], [[Great Baggi]], [[Jade Barroth]], [[Kushala Daora]], [[Morudomunto]], [[Lagombi]], [[Rajang]], [[Tigrex]], [[Stygian Zinogre]] |
| − | |Game Appearances = [[MH3]], [[MHP3]], [[MH3U]] |
+ | |Game Appearances = [[MH3]], [[MHP3]], [[MH3U]], [[MHXR]] |
| − | |Generation = |
+ | |Generation = [[Third Generation|Third]] |
}} |
}} |
||
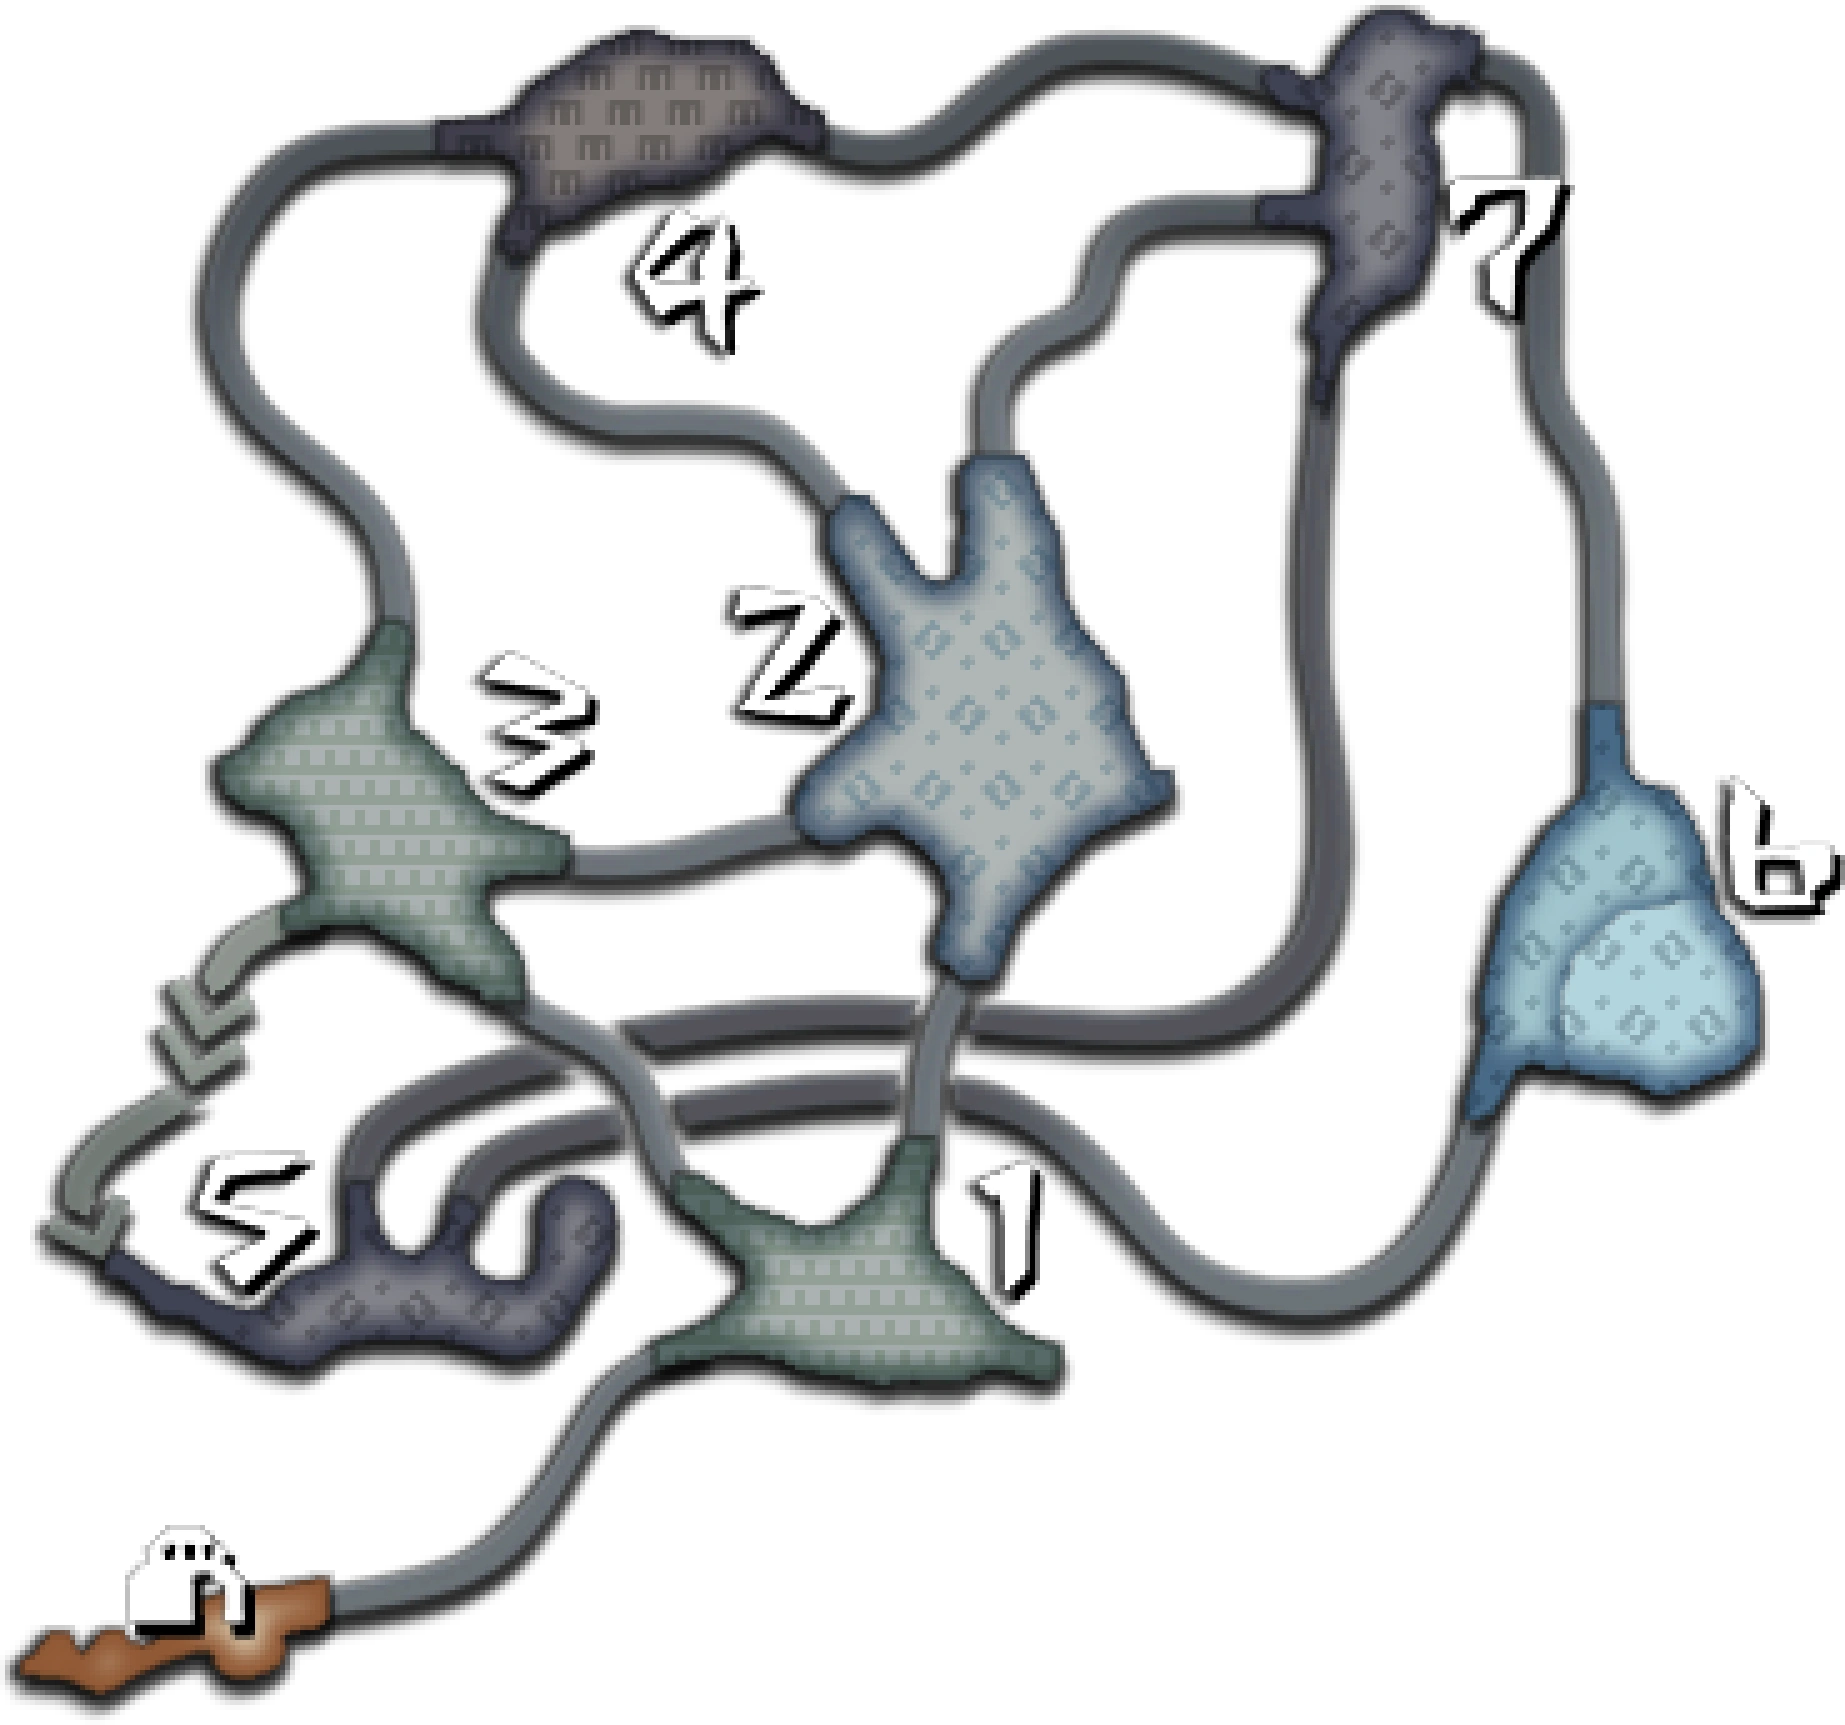
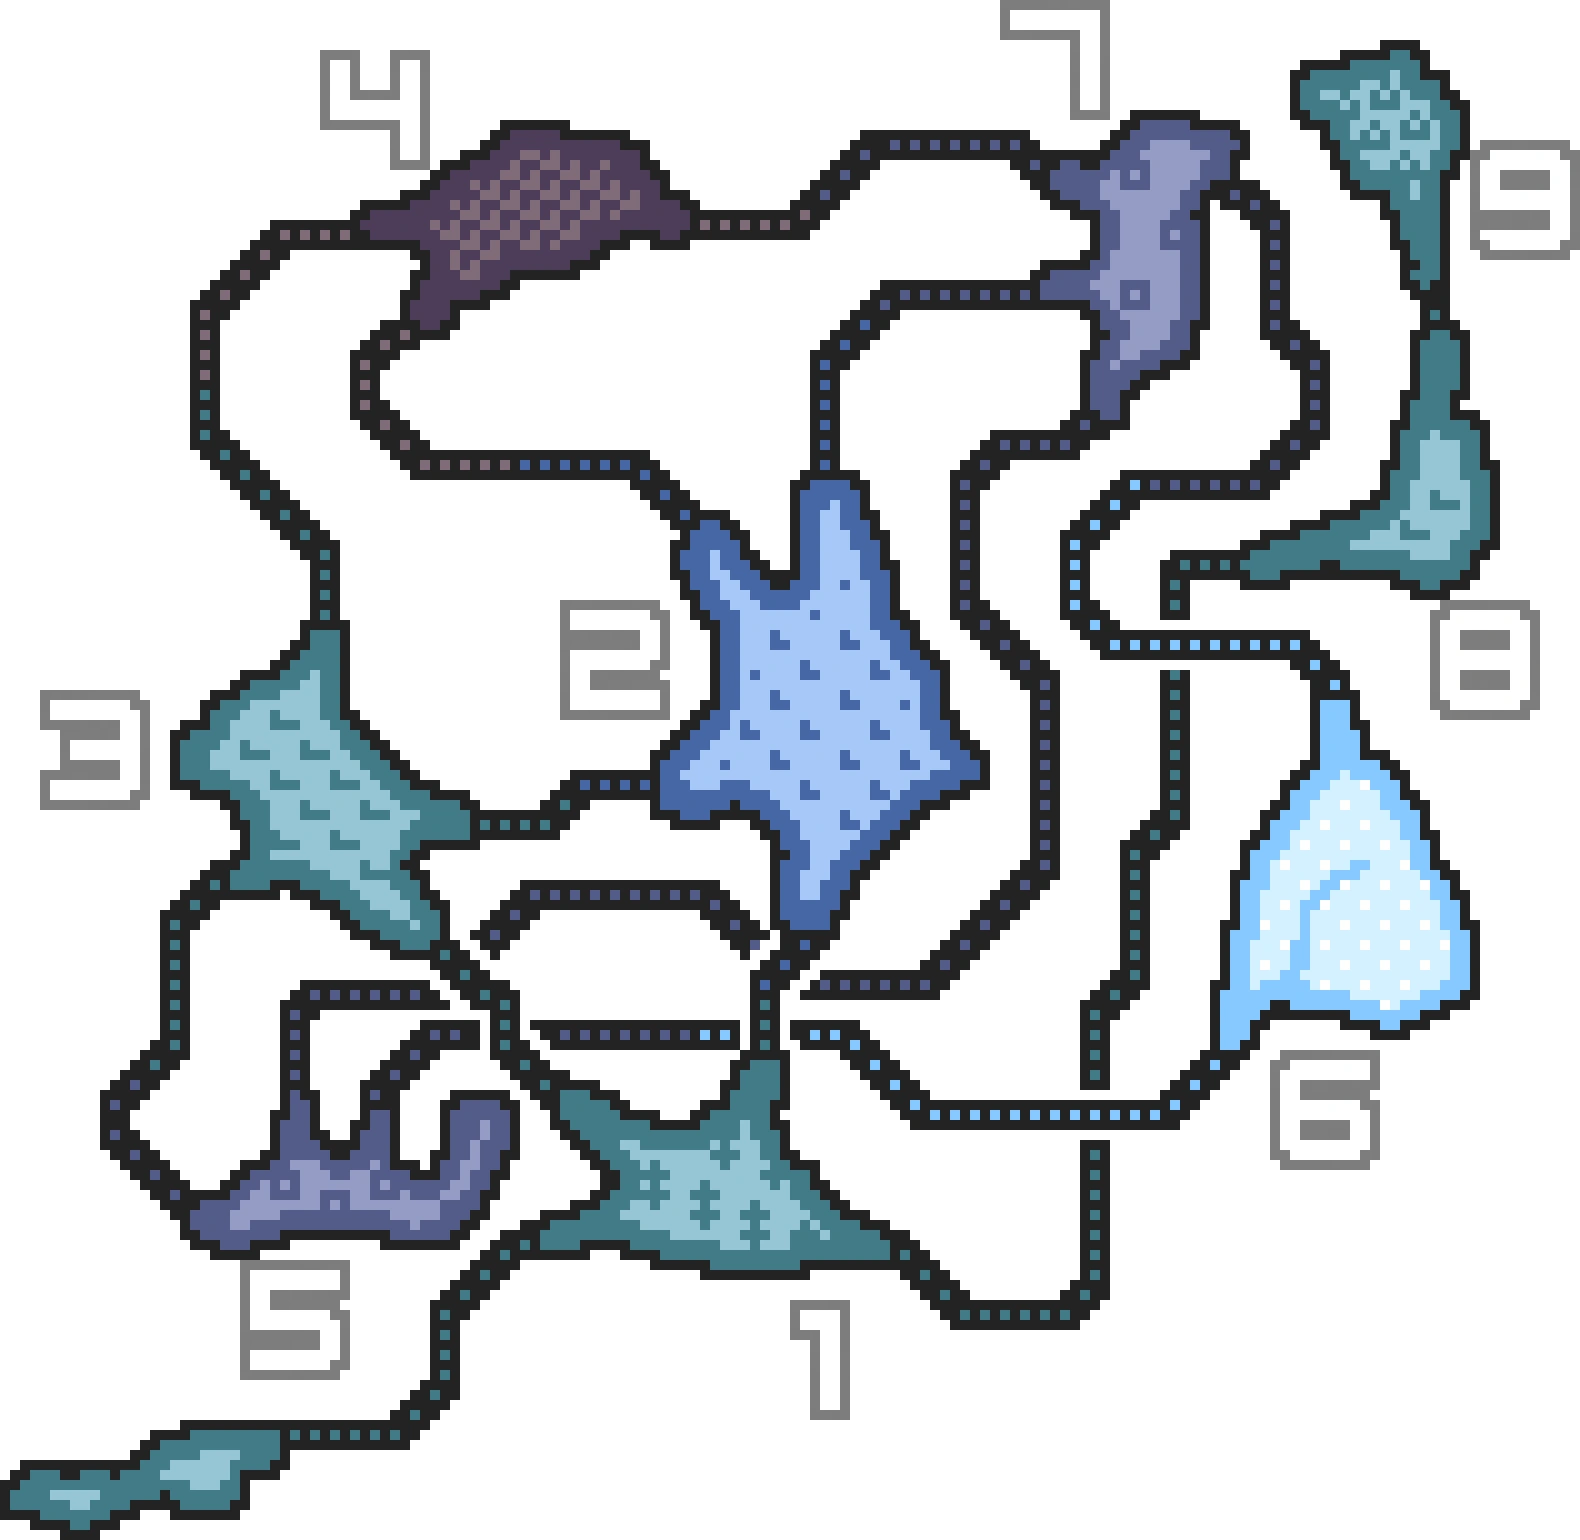
| + | [[File:MH3-Tundra Map.png|thumb|Tundra Map (MH3)]] |
||
| − | |||
| + | [[File:MHP3-Tundra Complete Map.png|thumb|Tundra Complete Map (MHP3rd)]] |
||
| − | |||
| − | [[File:Tundra-ResourceMap.png|thumb| |
+ | [[File:Tundra-ResourceMap.png|thumb|Tundra Resource Map (MH3)]] |
| + | [[File:MHP3-Tundra Resource Map.png|thumb|Tundra Resource Map (MHP3rd)]] |
||
| − | |||
| + | The '''Tundra '''is a location introduced in [[Monster Hunter 3]]. It is located in an icy stretch of land characterized by flowing rivers of fresh water, tall formations of ice, coniferous trees, and dark, frozen caves. This snowy place is home to many types of uniquely-adapted monsters, such as [[Lagombi]], [[Barioth]], [[Gigginox]], and [[Great Baggi]]. A Hot Drink is necessary in all areas except the base camp. |
||
| − | The '''Tundra '''is an icy land, harsh on life. A glacier floats by certain areas, whilst Popos forage in the snow. This area is known for both its lightly forested areas and terrifyingly dark caves. Unlike the [[Snowy Mountains]], the Tundra contains no high-altitude areas, and like the other general areas in the game, has been given a more creative and elaborate name. Hot Drinks or the armor skill Cold Cancel (High) are needed to stop your stamina level from depleting faster than usual. When hunting in the tundra at night, if the warming effect is not active then your stamina will decrease at a faster rate. Most areas actually only need the Cold Cancel (Low) armor skill to stop the stamina depleting effects, as shown by the dull blue and grey colors of the areas on the map. However, Areas 2 and 6 interchangeably require the Cold Cancel (High) armor skill, due to blizzard-like conditions present in those areas, depending on night and day respectively. This is shown by the bright blue coloring of these areas on the map depending on whether the hunt takes place during the day or during the night. |
||
| − | |||
| − | |||
==Common Resources== |
==Common Resources== |
||
| + | ===Bone=== |
||
| − | |||
| − | |||
| − | |||
| − | ==<span class="mw-headline" id="Bone" style="border-style:none;font-family:inherit;">Bone</span>== |
||
*Bone |
*Bone |
||
*Bone Husk L |
*Bone Husk L |
||
*Bone Husk S |
*Bone Husk S |
||
| − | *Dragonbone Relic ''(High |
+ | *Dragonbone Relic ''(High-rank)'' |
*Golden Bone |
*Golden Bone |
||
*Monster Bone M |
*Monster Bone M |
||
| Line 43: | Line 30: | ||
*Mystery Bone |
*Mystery Bone |
||
*Unknown Skull |
*Unknown Skull |
||
| + | ===Bug=== |
||
| − | ==<span class="mw-headline" id="Bug" style="border-style:none;font-family:inherit;">Bug</span>== |
||
*Bitterbug |
*Bitterbug |
||
*Carpenterbug |
*Carpenterbug |
||
| − | *Divine Rhino ''(High |
+ | *Divine Rhino ''(High-rank)'' |
*Flashbug |
*Flashbug |
||
*Godbug |
*Godbug |
||
| − | *Hercudrome ''(High |
+ | *Hercudrome ''(High-rank)'' |
*Insect Husk |
*Insect Husk |
||
*Killer Beetle |
*Killer Beetle |
||
| − | *King Scarab ''(High |
+ | *King Scarab ''(High-rank)'' |
| − | *Rare Scarab ''(High |
+ | *Rare Scarab ''(High-rank)'' |
*Royal Rhino |
*Royal Rhino |
||
*Thunderbug |
*Thunderbug |
||
| + | ===Fish=== |
||
| − | ==<span class="mw-headline" id="Fish" style="border-style:none;font-family:inherit;">Fish</span>== |
||
*Brocade Fish |
*Brocade Fish |
||
*Burst Arowana |
*Burst Arowana |
||
| Line 64: | Line 51: | ||
*Speartuna |
*Speartuna |
||
*Whetfish |
*Whetfish |
||
| + | ===Fruit=== |
||
| − | |||
| − | ==<span class="mw-headline" id="Fruit" style="border-style:none;font-family:inherit;">Fruit</span>== |
||
*Adamant Seed |
*Adamant Seed |
||
*Bomberry |
*Bomberry |
||
| Line 74: | Line 60: | ||
*Paintberry |
*Paintberry |
||
*Sleep Herb |
*Sleep Herb |
||
| + | ===Honey=== |
||
| − | ==<span class="mw-headline" id="Honey" style="border-style:none;font-family:inherit;">Honey</span>== |
||
*Honey |
*Honey |
||
*Insect Husk |
*Insect Husk |
||
*Snakebee Larva |
*Snakebee Larva |
||
| + | ===Ore=== |
||
| − | ==<span class="mw-headline" id="Ore" style="border-style:none;font-family:inherit;">Ore</span>== |
||
| − | *Adv Armor Sphere ''(High |
+ | *Adv Armor Sphere ''(High-rank)'' |
*Armor Sphere |
*Armor Sphere |
||
*Armor Sphere+ |
*Armor Sphere+ |
||
| + | *Hvy Armor Sphere (G-rank) |
||
| − | *Auristone Chunk ''(High |
+ | *Auristone Chunk ''(High-rank)'' |
*Auristone Piece |
*Auristone Piece |
||
| − | *Bloodrun Jewel ''(High |
+ | *Bloodrun Jewel ''(High-rank)'' |
*Bloodstone |
*Bloodstone |
||
| − | *Carbalite Ore ''(High |
+ | *Carbalite Ore ''(High-rank)'' |
| − | *Deep Bloodstone ''(High |
+ | *Deep Bloodstone ''(High-rank)'' |
*Earth Crystal |
*Earth Crystal |
||
| − | *Fucium Ore ''(High |
+ | *Fucium Ore ''(High-rank)'' |
| − | *Gracium ''(High |
+ | *Gracium ''(High-rank)'' |
*Golden Bone |
*Golden Bone |
||
*Ice Crystal |
*Ice Crystal |
||
| Line 98: | Line 85: | ||
*Machalite Ore |
*Machalite Ore |
||
*Mystery Charm |
*Mystery Charm |
||
| + | *Purecrystal (G-rank) |
||
*Rustshard |
*Rustshard |
||
| − | *Shining Charm ''(High |
+ | *Shining Charm ''(High-rank)'' |
| + | * Enduring Charm ''(G-rank)'' |
||
*Stone |
*Stone |
||
*Sunspire Jewel |
*Sunspire Jewel |
||
*Whetstone |
*Whetstone |
||
| − | |||
| − | |||
== Veggie Elder == |
== Veggie Elder == |
||
| − | |||
'''Location:''' Base Camp, jump off the ledge (to the right) near the exit |
'''Location:''' Base Camp, jump off the ledge (to the right) near the exit |
||
| + | {|class="wikitable" style="text-aligncenter; background-color:#EBEBEB; font-size:9pt;" |
||
| − | {|cellspacing="3" cellpadding="1" border="0" |
||
| + | |bgcolor="#3A5766"|<font color="white">'''Exchanged Item''' </font> |
||
| ⚫ | |||
| − | |bgcolor="# |
+ | |bgcolor="#3A5766"|<font color="white">'''Received Item''' </font> |
| − | |bgcolor="# |
+ | |bgcolor="#3A5766"|<font color="white">'''Gifts''' </font> |
| − | |width="15"| |
||
| − | |bgcolor="#996600" width="150"|'''Gifts''' |
||
|- |
|- |
||
| − | | |
+ | |[[File:MH4G-Ore Icon Red.png|19px]]Bloodstone |
| + | |[[File:MH4G-Meat Icon Orange.png|19px]]Ration |
||
| − | |bgcolor="#ffff99"|Ration |
||
| ⚫ | |||
| − | |width="15"| |
||
| + | *[[File:MH4G-Bait Icon Yellow.png|19px]]Arowana Bait |
||
| − | |valign="top" bgcolor="#ffff99" rowspan="7"| |
||
| + | *[[File:MH4G-Medicine Icon Light Blue.png|19px]]Antidote |
||
| − | *Arowana Bait |
||
| + | *[[File:MH4G-Sac Icon Red.png|19px]]Might Pill |
||
| − | *Antidote |
||
| + | *[[File:MH4G-Sac Icon Orange.png|19px]]Adamant Pill |
||
| − | *Might Pill |
||
| + | *[[File:MH4G-Medicine Icon Orange.png|19px]]Psychoserum |
||
| − | *Adamant Pill |
||
| + | *[[File:MH4G-Pickaxe Icon Yellow.png|19px]]Mega Pickaxe |
||
| − | *Psychoserum |
||
| + | *[[File:MH4G-Meat Icon Orange.png|19px]]Well-done Steak |
||
| − | *Mega Pickaxe |
||
| + | *[[File:MH4G-Trap Icon Green.png|19px]]EZ Shock Trap |
||
| − | *Well-done Steak |
||
| + | *[[File:MH4G-Bomb Icon Pink.png|19px]]Felvine Bomb |
||
| − | *EZ Shock Trap |
||
| + | *[[File:MH4G-Medicine Icon Yellow.png|19px]]Power Juice |
||
| − | *Felvine Bomb |
||
| − | *Power Juice |
||
|- |
|- |
||
| − | | |
+ | |[[File:MH4G-Monster Parts Icon Blue.png|19px]]Wyvern Tear |
| − | | |
+ | |[[File:MH4G-Medicine Icon Green.png|19px]]Mega Potion |
| − | |width="15"| |
||
|- |
|- |
||
| − | | |
+ | |[[File:MH4G-Meat Icon Red.png|19px]]Popo Tongue |
| − | | |
+ | |[[File:MH4G-Medicine Icon Red.png|19px]]Hot Drink |
| − | |width="15"| |
||
| ⚫ | |||
|- |
|- |
||
| − | | |
+ | |[[File:MH4G-Ticket Icon Green.png|19px]]VE Ticket |
| − | | |
+ | |[[File:MH4G-Medicine Icon Orange.png|19px]]Armorskin |
| − | | |
||
|- |
|- |
||
| − | | |
+ | |[[File:MH4G-Ticket Icon Green.png|19px]]VE Ticket Bronze |
| − | | |
+ | |[[File:MH4G-Claw Icon Red.png|19px]]Gigginox Claw |
| − | | |
||
|- |
|- |
||
| − | | |
+ | |[[File:MH4G-Ticket Icon Green.png|19px]]VE Ticket Silver |
| + | |[[File:MH4G-Claw Icon White.png|19px]]Barioth Spike |
||
| − | |bgcolor="#ffff99"|Barrioth Spike |
||
| − | | |
||
|- |
|- |
||
| − | | |
+ | |[[File:MH4G-Ticket Icon Green.png|19px]]VE Ticket Gold |
| − | | |
+ | |[[File:MH4G-Ball Icon Blue.png|19px]]Brachydios Gem (MH3U) |
| − | | |
||
|- |
|- |
||
| − | | |
+ | |[[File:MH4G-Ticket Icon Green.png|19px]]VE Ticket Cosmic |
| − | | |
+ | |[[File:MH4G-Mantle Icon Blue.png|19px]]Brachydios Pallium (MH3U) |
|} |
|} |
||
| Line 163: | Line 139: | ||
[[file:Tundra-secretarea.jpg|400px]] |
[[file:Tundra-secretarea.jpg|400px]] |
||
| − | + | Dragonbone Relics are gathered here as well as Gracium, Isisium, Bloodrun Jewel, Stone, Purecrystal and Ice Crystal. |
|
| − | The only way to get up to this secret area is with the " |
+ | The only way to get up to this secret area is with the "Felyne Explorer" food skill and randomly in High-rank and G-rank quests. |
==Notes== |
==Notes== |
||
| − | *Behind the bed at the Base Camp, is a map of the Monster Hunter |
+ | *Behind the bed at the Base Camp, is a map of the Monster Hunter world. |
*Large icy rocks float by in the base camp, if watched carefully, one can observe the same pattern of ice rocks repeatedly floating by. |
*Large icy rocks float by in the base camp, if watched carefully, one can observe the same pattern of ice rocks repeatedly floating by. |
||
| − | *While large ice rocks float by in the base camp, so do the large glacier walls, this hints at a warmer Tundra, causing |
+ | *While large ice rocks float by in the base camp, so do the large glacier walls, this hints at a warmer Tundra, causing the glaciers to melt. |
==Changes in Monster Hunter Portable 3rd== |
==Changes in Monster Hunter Portable 3rd== |
||
| ⚫ | |||
| − | |||
| − | |||
| − | |||
| ⚫ | |||
*The path from Area 3 to Area 5 is no longer one-way. |
*The path from Area 3 to Area 5 is no longer one-way. |
||
| − | *Mining is done from cracks in the wall as in MHFU, instead of |
+ | *Mining is done from cracks in the wall as in MHFU, instead of randomly-spawning crystals. |
*[[Jade Barroth]] and [[Deviljho]] can break open the path to the Areas 8 and 9. Dragon bone relics can be found here. |
*[[Jade Barroth]] and [[Deviljho]] can break open the path to the Areas 8 and 9. Dragon bone relics can be found here. |
||
==Changes in Monster Hunter 3 Ultimate== |
==Changes in Monster Hunter 3 Ultimate== |
||
| − | *[[Brachydios]] can open the path to Area 8 |
+ | *[[Brachydios]] and [[Stygian Zinogre]] can open the path to Area 8 and 9. |
==Gallery== |
==Gallery== |
||
| + | ===Monster Hunter Tri=== |
||
<gallery> |
<gallery> |
||
FrozenLand-basecamp.jpg |
FrozenLand-basecamp.jpg |
||
| Line 196: | Line 170: | ||
FrozenLand-area6a.jpg |
FrozenLand-area6a.jpg |
||
FrozenLand-area7.jpg |
FrozenLand-area7.jpg |
||
| ⚫ | |||
| − | Image:FrozenLand.png |
||
| + | ===Miscellaneous=== |
||
| ⚫ | |||
| + | <gallery> |
||
| − | |||
| + | Tundra.png - MHP3 Tundra Resource Map |
||
| − | |||
| + | </gallery> |
||
| − | |||
| + | {{-}} |
||
| − | |||
| + | ==Music Themes== |
||
| − | <youtube>dBY_qQ2LnK0</youtube><br /> |
||
| + | {|class="wikitable" align="center" style="text-align:center; background-color:#EBEBEB; font-size:9pt;" |
||
| − | |||
| + | !style="background-color:#3A5766; color:#ffffff;" | |
||
| − | <br /> |
||
| + | !style="background-color:#3A5766; color:#ffffff;" |Title |
||
| − | |||
| ⚫ | |||
| − | |||
| + | |[[File:Monster Hunter 3 (tri-) OST - Tundra Battle|70px]] |
||
| − | |||
| ⚫ | |||
| − | |||
| ⚫ | |||
| − | {{Template:AreaNavigation}} |
||
| + | {{Navbox-Locations}} |
||
[[Category:Areas]] |
[[Category:Areas]] |
||
[[Category:MH3 Database]] |
[[Category:MH3 Database]] |
||
Revision as of 12:52, 13 May 2019
Tundra Map (MH3)
Tundra Complete Map (MHP3rd)

Tundra Resource Map (MH3)
Tundra Resource Map (MHP3rd)
The Tundra is a location introduced in Monster Hunter 3. It is located in an icy stretch of land characterized by flowing rivers of fresh water, tall formations of ice, coniferous trees, and dark, frozen caves. This snowy place is home to many types of uniquely-adapted monsters, such as Lagombi, Barioth, Gigginox, and Great Baggi. A Hot Drink is necessary in all areas except the base camp.
Common Resources
Bone
- Bone
- Bone Husk L
- Bone Husk S
- Dragonbone Relic (High-rank)
- Golden Bone
- Monster Bone M
- Monster Bone S
- Mystery Bone
- Unknown Skull
Bug
- Bitterbug
- Carpenterbug
- Divine Rhino (High-rank)
- Flashbug
- Godbug
- Hercudrome (High-rank)
- Insect Husk
- Killer Beetle
- King Scarab (High-rank)
- Rare Scarab (High-rank)
- Royal Rhino
- Thunderbug
Fish
- Brocade Fish
- Burst Arowana
- Pin Tuna
- Sleepyfish
- Small Goldenfish
- Speartuna
- Whetfish
Fruit
- Adamant Seed
- Bomberry
- Huskberry
- Ice Crystal
- Might Seed
- Nulberry
- Paintberry
- Sleep Herb
Honey
- Honey
- Insect Husk
- Snakebee Larva
Ore
- Adv Armor Sphere (High-rank)
- Armor Sphere
- Armor Sphere+
- Hvy Armor Sphere (G-rank)
- Auristone Chunk (High-rank)
- Auristone Piece
- Bloodrun Jewel (High-rank)
- Bloodstone
- Carbalite Ore (High-rank)
- Deep Bloodstone (High-rank)
- Earth Crystal
- Fucium Ore (High-rank)
- Gracium (High-rank)
- Golden Bone
- Ice Crystal
- Iron Ore
- Isisium
- Lightcrystal
- Machalite Ore
- Mystery Charm
- Purecrystal (G-rank)
- Rustshard
- Shining Charm (High-rank)
- Enduring Charm (G-rank)
- Stone
- Sunspire Jewel
- Whetstone
Veggie Elder
Location: Base Camp, jump off the ledge (to the right) near the exit
| Exchanged Item | Received Item | Gifts |
| ||
Secret Area
Dragonbone Relics are gathered here as well as Gracium, Isisium, Bloodrun Jewel, Stone, Purecrystal and Ice Crystal.
The only way to get up to this secret area is with the "Felyne Explorer" food skill and randomly in High-rank and G-rank quests.
Notes
- Behind the bed at the Base Camp, is a map of the Monster Hunter world.
- Large icy rocks float by in the base camp, if watched carefully, one can observe the same pattern of ice rocks repeatedly floating by.
- While large ice rocks float by in the base camp, so do the large glacier walls, this hints at a warmer Tundra, causing the glaciers to melt.
Changes in Monster Hunter Portable 3rd
- The cave areas do not require a torch to be lit. They are all pre-lit.
- The path from Area 3 to Area 5 is no longer one-way.
- Mining is done from cracks in the wall as in MHFU, instead of randomly-spawning crystals.
- Jade Barroth and Deviljho can break open the path to the Areas 8 and 9. Dragon bone relics can be found here.
Changes in Monster Hunter 3 Ultimate
- Brachydios and Stygian Zinogre can open the path to Area 8 and 9.
Gallery
Monster Hunter Tri
")
")
")
")
")
")
")
")
")
Miscellaneous
Music Themes
| Title | |
|---|---|
| |
MHP3: Tundra Music Theme |